
Call: 0403 816660 for more information
or email us: enquire@resurrection.com.au |
| How to Build Your Own Front Fence Picket fence construction and Garden fencing (continued) |
| Page 3 |
| Set the post
in the ground using either a concrete mix (1 part cement,
2 parts 14mm screenings and 3 parts concrete sand. You can get
this from your local yard), or a mix of cement and the soil
which has come out of the post hole. Mix dry. You will want
about 100mm in the bottom of the hole. Then insert the post.
If you have already detailed the post, you will need to set
it to the correct height by cutting off the bottom of the post
until it the top is aligned with the other posts. You will need
to set the end posts to the correct height before setting the
middle posts. When the post is correctly positioned, add one
bucket of water, then gradually add the concrete mix. Using
a crowbar, you will be able to mix the concrete with the water
as you go. Add water or concrete as needed. Note that the concrete
mix strength is not as critical in this low stress use as it
would be if pouring a slab or some other Ferro-cement application.
Set the end posts first, and then run a string line between
the end posts. This will give you the line for the middle posts.
Then set the gate posts, then the intermediate posts. Whether
stepped or running with the ground contour, all featured post
tops should be in line. This will ensure your fence looks straight
and uniform. Dont forget to set the posts perpendicular using
a spirit level. Finally, make sure the face of the posts is
square with the string line.
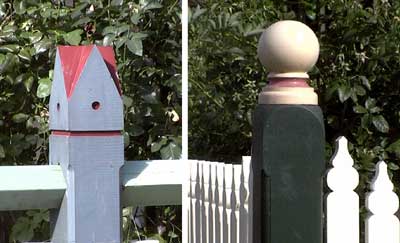
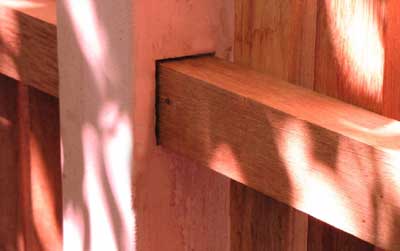
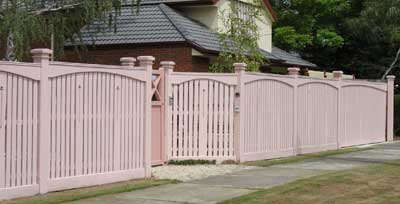
Carpentry & frame The detailing of your fence will depend upon your skill as a carpenter. You can buy turned or cast iron capitals to place on the top of Victorian posts. If you want something more Edwardian, you will need to cut the shape directly into the top of the post. A simple pyramid is not usually beyond the handyman. Routed collars and chamfers will need the right tools. Joints between posts and frame have traditionally been made in two ways; the rebate and the mortise. The mortise involves making a hole in the side of the post, then sliding the rail or plinth into the hole. This gives a strong joint, neat joint with a pleasing depth of aspect. The simpler rebate involves cutting a slot into the face of the post for the rail to be nailed into. Which joint to use will depend upon the style you are after. We use mortises for all featured posts and rebates for most intermediate posts. This features the end or gate posts and hides the intermediates. Once assembled, fix with a skewed 75mm bullet head galvanized nail. Cladding You have built the frame and had a cup of tea. Now we are really starting to see results. You can clad your fence frame with just about anything. If you are after a barrier, you may choose you may choose Ripple iron or blue board. Pickets can be closely spaced for privacy or more traditionally. Woven wire or chain mesh will provide the opportunity to highlight those roses. Pickets will be nailed on; wire is fixed with U shaped fencing staples, while ripple iron will be screwed to the rails. A nail gun will make short work of pickets. However, if you are hand nailing, you will have to drill a pilot hole. Modern tech screws will drill through metal, meaning no pre-drilling is necessary when fixing ripple iron. Capping and cover boards need to be stable as to resist shrinkage. Ridge capping or molded handrail capping should be kiln dried. Otherwise the capping will shrink when drying out, leaving an unsightly gap at the posts. Cover boards can be cut out of dimensionally stable 18mm exterior or marine ply. |
 |
 |
|
 |
|
|
Page (3 0f 4) Go to Next Page 4 |
| Back to Top |